Showing posts with label Blogspot_Tutorials. Show all posts

Monday, 22 December 2008

CSS Tutorial Free Tool CSS Tab Designer

CSS Tutorial Free Tool CSS Tab Designer

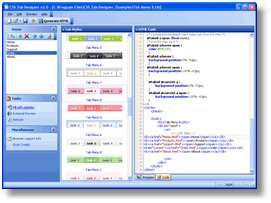
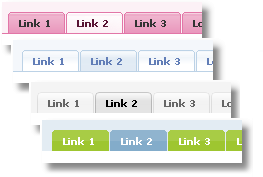
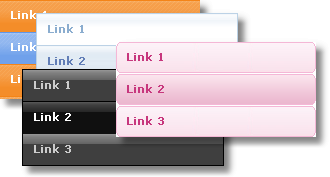
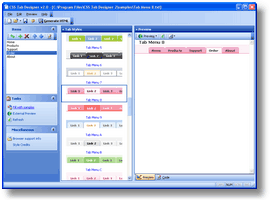
In my previous posting, I shared about a tool called CSS Menu Generator, now I would like to share about a tool again, called CSS Tab Designer. This tool still relates with CSS Menu Generator. The main function of this tool is almost similar to CSS Menu Generator. However, if Kang Rohman can differentiate between these tolls, I think CSS Tab Designer is better that CSS Menu Generator because it can result elegant and professional CSS Menu.

cssTabDesigner vertical-tabs

th_csstab2-1 th_csstab2-2

With this tool, you can make Horizontal Tab Menu or Vertical Tab Menu easily.

To get and use this tool, you don’t have to spend money, just download it below;

http://www.highdots.com/css-tab-designer

Happy downloading readers!!!

Blogspot Tutorial Design Your Logo at logoyes.com

Design Your Logo at logoyes.com

logoyes.com For a company, having a logo or an icon is a must because logo can represent what the company looks like. By having a logo or an icon, people will know the brand image and keep it in their memory. Logo usually has a mission to deliver the message of the company to the people, visitors or readers. A log is made and designed to be the representative of the company, the company products and should be able to attract a lot of attention. A logo can also tell about a website. Web site logo can describe what the site is like? From the explanation above we can know that a logo or an icon is very important or crucial.


Making a Logo Design or designing a logo could be easy because we can use many free software but free logo maker usually doesn’t satisfy our will. Free Logo Maker doesn’t give the best service for us. It means that we have to find a professional logo design to make a professional logo for our company or site. One site that can be you reference to be a place to have Free Logo Design is logoyes.com. LogoYes is the main provider of do-it-yourself logos and other premium design products to small businesses around the world. LogoYes is a pioneer of do-it-yourself logo creation. They also have a patent pending on their unique processes. As a free online service, they will help a company or website to design or build the company brand through their excellent, beautiful and unique logo. They provide almost 500 logo that we can select.

Due to their excellent service, there have been many small business, big business and company which use their service and proven that their Logo Design really help increasing the brand image make their business or company more popular. Now, it is time for us, our company or anyone who need logo to use this Free Logos Help.

Add Image Always On top In Blogger Tutorial

Add Image Always On top In Blogspot Tutorial

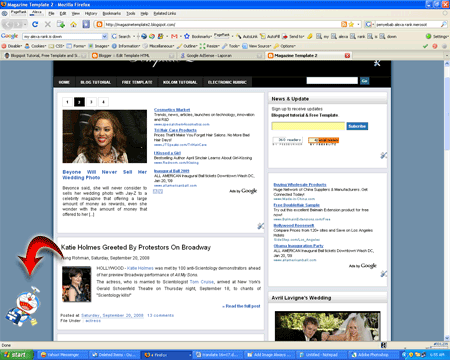
If you like to display an image in your blog, Kang Rohman has an interesting info. This info is about adding image that will always appear in the front side of your blog, the image will always appear even though the visitors do scrolling down in your blog. See below to see the screenshot.

doraemon

Are you interested in knowing the tricks? Below are the steps:

#1 step

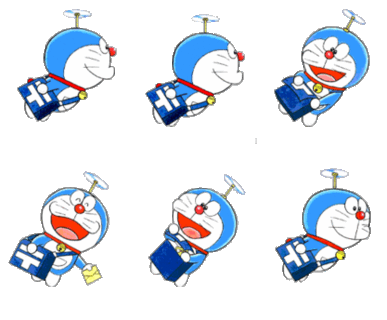
  1. Make a picture you want to display. I suggest you to make 125 X 125 pixels, so it doesn’t really disturb your visitors, the picture format is up to you and you may make animation image. Example:

    Doraemon-1

  2. Upload the image into a place where you usually save the picture. If you still don’t know how to upload the picture? Just read this posting
  3. take note the image address tat you have uploaded. Example :

    https://blogger.googleusercontent.com/img/b/R29vZ2xl/AVvXsEgGVyG8Xbg4wNkfdQZGJTptpXJo4oWoHPucAsX3V-kbHSn2MzIi11W9baeH90mwRHYJ9CeKlXloaK9VdVisIZDAkTu8gyumAHTQVREYQD4jq20QdyrQyId8z6oI4gg1wsRO2Xntnz6OB-o/?imgmax=800

#2 step

  1. Log in into blogger with your ID.
  2. Click Layout
  3. Click Edit HTML Tab
  4. Click Download Full Template and please back up your template first.
  5. Copy and paste the following code right above ]>></b:skin>

    #top_image {
    position:fixed;
    _position:absolute;
    bottom:5px;
    left:5px;
    clip:inherit;
    _top:expression(document.documentElement.scrollTop+
    document.documentElement.clientHeight-this.clientHeight);
    _left:expression(document.documentElement.scrollLeft+ document.documentElement.clientWidth - offsetWidth); }

  6. Find this code </body> in your template (end of your template code)
  7. Copy and paste the following code right above </body> (sample only)

    <div id='top_image'>
    <img border='0' src='https://blogger.googleusercontent.com/img/b/R29vZ2xl/AVvXsEgGVyG8Xbg4wNkfdQZGJTptpXJo4oWoHPucAsX3V-kbHSn2MzIi11W9baeH90mwRHYJ9CeKlXloaK9VdVisIZDAkTu8gyumAHTQVREYQD4jq20QdyrQyId8z6oI4gg1wsRO2Xntnz6OB-o/?imgmax=800'/>
    </div>

  8. Click Save Template
  9. Done and please see the result.

The code above is used to display the image on the left bottom of the screen. You can change that position as you want, example on the right bottom of the screen, top right of the screen and top left of the screen. The code that you can edit is as below;

#top_image {
position:fixed;
_position:absolute;
bottom:5px;
left:5px;

clip:inherit;
_top:expression(document.documentElement.scrollTop+
document.documentElement.clientHeight-this.clientHeight);
_left:expression(document.documentElement.scrollLeft+ document.documentElement.clientWidth - offsetWidth); }

The red code is the code tat you can change as you like

The code for right bottom of the screen

bottom:5px;
right:5px;

The code for top right of the screen

top:5px;
right:5px;

The code for top left of the screen

top:5px;
left:5px;

That example image cannot clicked with your visitor, if you want your image can clicked, you only add a link code, example :

<div id='top_image'>

<a href=”http://nachomasti.blogspot.com”><img border='0' src='https://blogger.googleusercontent.com/img/b/R29vZ2xl/AVvXsEgGVyG8Xbg4wNkfdQZGJTptpXJo4oWoHPucAsX3V-kbHSn2MzIi11W9baeH90mwRHYJ9CeKlXloaK9VdVisIZDAkTu8gyumAHTQVREYQD4jq20QdyrQyId8z6oI4gg1wsRO2Xntnz6OB-o/?imgmax=800'/> </a>
</div>

Happy blogging with

Add Stript ad in Blogspot Tutorial

Add Stript ad in Blogger Tutorial

If you like blogging with wordpress engine, I believe that you are familiar with a plugin called Stript ad which is created by MaxBlogPress. With this Stript ad plugin, you can deliver the important message for your blog visitors. Now, can we use stript ad plugin in blogger? Don’t’ worry, because we do it because stript ad plugin use JavaScript which means that we can add it in blogger or blogspot.

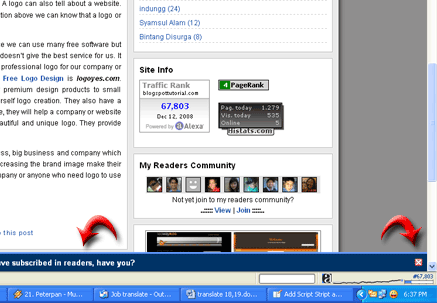
One of implementation that I have applied is the message to subscribe the feed as you can see at the bottom of this blog:

strip ad plugin

If you are interested in adding this plugin in your blog, just read the guidance below;

  1. Login into blogger with your ID
  2. Click Layout
  3. Click Edit HTML tab
  4. Click Download Full Template and please back up your template first.
  5. Copy and Paste the following code right above ]]><b:skin>
    #mta_bar {
    background:#003366;
    border-top: 3px solid #6699ff;
    margin: 0;
    padding: 7px 0;
    z-index: 100;
    bottom:0px;
    right:0px;
    width: 100%;
    overflow: auto;
    position: fixed;
    }
    * html #mta_bar{
    /*IE6 hack*/
    position: absolute;
    width: expression(document.compatMode=="CSS1Compat"? document.documentElement.clientWidth+"px" : body.clientWidth+"px");
    }
    #mta_bar .left { float: left; text-align: center; font-family: Arial; font-size: 13px; font-weight: bold; font-style: normal; color: #0000FF; width:92%;}
    #mta_bar .right {font-family: Arial, Helvetica, sans-serif; float: right; text-align: center; font-weight: normal; font-size: 10px;letter-spacing: 0; width: 30px; white-space: nowrap;}
    #mta_bar .right a {font-size: 10px; color: #0000FF; text-decoration: underline;}
    #mta_bar .right a:hover {font-size: 10px; color: #0000FF; text-decoration: none;}
    #left_bar a {background: url('https://blogger.googleusercontent.com/img/b/R29vZ2xl/AVvXsEiq0P44R1zI5ruYab7Y6Uhr3o5yDum5HUFjmmHzNnqo8HCwQ0fS7gnDDtk84pcRx4vV9_97IeGWRQO6fMfPzHswBjt1jB-DEiev5dduVx7hM0NkuHR3gU2J2MJ1CQHHZrb5pJaJHEY7pzY/?imgmax=800') no-repeat; text-decoration: none; color: #fff; padding:5px 0px 5px 30px;}
    #left_bar a:hover { text-decoration: underline; color: #fff; }


  6. Find this code </head> in your template


  7. Copy and paste the following code right above </head>

    <script type='text/javascript'>
    //<![CDATA[
    var mta_arr = new Array();
    var mta_clear = new Array();
    function mtaFloat(mta) {
    mta_arr[mta_arr.length] = this;
    var mtapointer = eval(mta_arr.length-1);
    this.pagetop = 0;
    this.cmode = (document.compatMode && document.compatMode!="BackCompat") ? document.documentElement : document.body;
    this.mtasrc = document.all? document.all[mta] : document.getElementById(mta);
    this.mtasrc.height = this.mtasrc.offsetHeight;
    this.mtaheight = this.cmode.clientHeight;
    this.mtaoffset = mtaGetOffsetY(mta_arr[mtapointer]);
    var mtabar = 'mta_clear['+mtapointer+'] = setInterval("mtaFloatInit(mta_arr['+mtapointer+'])",1);';
    mtabar = mtabar;
    eval(mtabar);
    }
    function mtaGetOffsetY(mta) {
    var mtaTotOffset = parseInt(mta.mtasrc.offsetTop);
    var parentOffset = mta.mtasrc.offsetParent;
    while ( parentOffset != null ) {
    mtaTotOffset += parentOffset.offsetTop;
    parentOffset = parentOffset.offsetParent;
    }
    return mtaTotOffset;
    }
    function mtaFloatInit(mta) {
    mta.pagetop = mta.cmode.scrollTop;
    mta.mtasrc.style.top = mta.pagetop - mta.mtaoffset + "px";
    }
    function closeTopAds() {
    document.getElementById("mta_bar").style.visibility = "hidden";
    }
    //]]>


    </script>


  8. find this code </body> in your template ( end of template code)


  9. Copy and paste the following code right above </body> (sample only : change the red mark with your’s)

    <div id='mta_bar'>

    <div id='left_bar'><span class='left'><a href='http://feeds.feedburner.com/BlogspotTutorial' target='_blank'>More than 300 have subcribed in readers, have you?</a></span></div>


    <span class='right' onmouseout='self.status=&apos;&apos;' onmouseover='self.status=&apos;blogspottutorial.com&apos;;return true;'> <img align='absmiddle' border='0' onClick='closeTopAds();return false;' src='https://blogger.googleusercontent.com/img/b/R29vZ2xl/AVvXsEhbrLnEx0fYb2YVqAm7GZxx-rTop2qxrWBCYi9oVgA7B3Qt4-vTjLXSf9r7-IxdVXf3W5CEKsDezHkaWM-7uL2LPR48gqPOWQqfOqQ8mhVPGNbXrl04tkPWv5y86rshs8Ux809m6t-2j2c/?imgmax=800' style='cursor:hand;cursor:pointer;'/></span></div>


  10. Click Save template


  11. Finish and see the result.


For wordpress self hosting user, you can download strips ad plugin directly in MaxBlogPress.


Thanks to my friend OOm for this trick


Have a nice trying!!

Blogger Tutorial / Sign Up In Feedburner

Blogger Tutorial / Sign Up In Feedburner

feedburner.com Someone has asked me the tutorial about adding the banners of Add to Google, My Yahoo and others. Well, it is very simple to answer. If you want to add those banners, you will have to join http://www.feedburner.com. By the way, what is http://www.feedburner.com?

www.feedburner.com is a website that gives syndication or feed services. Based on the data I have read from the page news of this site, now feedburner has been taken over by Google, so we can transfer our blog feed into feed in feedburner.com.

If you want to make your blog famous, I suggest you to join feedburner. Their service is also free. And if you want to sign up but still don’t know to do it, just read the steps below;

  1. Please visit http://www.feedburner.com
  2. Click Register at the top of the page
  3. Fill in the whole available form
    • Username --> type your desired username, example: japra
    • password --> type your desired password example: japratea
    • Password (again) --> retype your password
    • Email address --> type your email here
    • Secret Question --> type the secret question here and the answer is only known by you. Example: who is your girl friend?
    • Secret Answer --> type the answer of the question above. Example: juleha
    • Click Sign in button
  4. If it is successful, you will read welcome from feedburner
  5. Type your blog address in Burn a feed right this example : http://template-unik.blogspot.com
  6. Mark at the radio button available and choose any button you like, and then click next.
  7. Change Feed Title with Feed Address if you want to change it. After that click Active feed button.
  8. You will read Congrats. Just click Next button directly.
  9. Give a mark at Clickthroughs and I want more! have FeedBurner stats PRO also track (PRO service is also free now)
  10. click Next button
  11. click Optimize tab
  12. Please do the setting as your interest. The most important thing is that you have to activate Smart feed feature because this feature functions to make our feed function compatible or match with any of your feed reader.
  13. Click SmartFeed and then click Active button
  14. Click Publicize tab, please choose the features you want but the most famous and often used are feedCount. Ok, click FeedCount
  15. Choose the style from feedcount; ordinary one or animation one. Give a mark at ratio button next to it.
  16. Click Active button
  17. Copy the HTML given in text area and paste into notepad.
  18. Click ChickletChooser to choose any kinds of banner or chicklets as asked by Setyo.
  19. Give a mark at ration button next to each chicklet, then copy the HTML code and paste it into notepad. Note: every time you give a mark at the ration button for each chicklet, automatically HTML code of each chicklet will change
  20. Click Pingshot, give a mark next to Ping-O-matic and Newsgator, click available dropdown menu, then choose one, click Add button, Click dropdown menu again if you want to add again, click Add.
  21. Click Active button.
  22. Click Headline Animator to get animation banner.
  23. Click dropdown menu under theme, choose one that you like (classic type is the most favorite of many people)
  24. Click Active button.
  25. Click dropdown menu next to Add to, choose blogger blog.
  26. Click Next button.
  27. After new window appear, click Add to Blogger
  28. Please Sign in into blogger.
  29. Choose the blog that you want to add the animation banner. Then click Add Widget button. The animation banner will automatically be added in your blog. Note: this way is for new template user.
  30. Sign out from the site
  31. done

For other features, please try them by yourself ok. If I explain all, it will be too many and take a long time but the main reason is that I am tired to type again…ok bro clip_image001

To add HTML code into blog is easy and I believe that you can do it, too. I have explained a lot about this one. If you use classic template, just paste into the template code but if you use new template, just Add a Gadget, then choose HTML/JavaScript, paste the code and done.
Last but not least. As I have explained above that feedburner has been taken over by google. It means that blogger feed can be transferred into feed burner.

Read below to do it

  1. Sign in into blogger
  2. Click Setting menu
  3. Click Site Feed
  4. Next to Allow Feed Blog, choose Full.
  5. Save the feed from feedburner at the box next to Post Feed Redirect URL. Example, the feed address from feedburner is

http://feeds.feedburner.com/freedownload

  1. If you have google adsense account, you can save it at Feed Item Footer
  2. click save settings
  3. Done

Ok bloggers, welcome to feedburner and now your blog is more famous.

Make Breadcrumb Navigation in Blogger Tutorial

How To Make Breadcrumb Navigation In Blogspot Tutorial

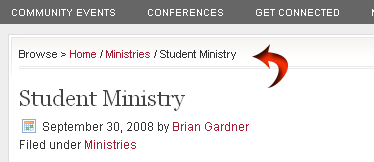
If you are an observer of revolution theme created by Brian Gardner, you might have seen a simple row of navigation above the title of an article that you’re reading, like the following screenshot:

breadcrumb

The navigation like above is known better by the name of “breadcrumb-navigation”. With the “breadcrumb-navigation” the readers can easily know the position of an article that’s being read and also can search the articles in the same category.

Can “breadcrumb-navigation” be installed in blogger? The answer is of course, it can. With a few modifications of your template code, then the “breadcrumb-navigation” will be yours soon. Below are the ways:

  1. Please log in to blogger with your ID
  2. Click Layout
  3. Click Edit HTML tab
  4. Click Download Full Template and please back up your template first
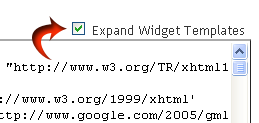
  5. Please check the small box beside Expand Widget Template

    expand

  6. Find the code ]]>
  7. Copy and paste the code below exactly above the code ]]>

    .breadcrumbs {
    padding:5px 5px 5px 0px;
    margin: 0px 0px 15px 0px;
    font-size:95%;
    line-height: 1.4em;
    border-bottom:3px double #e6e4e3;
    }

  8. Find the following code in your template :

  9. Copy and paste the code below exactly below the code


    Browse » Home


    »


    »


    Browse » Home » Archives for


  10. Click Save Template button
  11. Wait for a while until your template saved
  12. Open your blog, click the title of an article, see the result
  13. Finished.

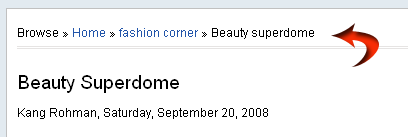
If your steps are correct, the “breadcrumb-navigation” will be like this:

breadcrumbsample

Happy trying!

Hide Disable Remove Blogger Navbar From Your Blog

Hide Disable Remove Blogger Navbar From Your Blog

Learn how to hide,disable or remove the blogger navbar(navigation bar) from your blog.

First,let us see what blogger navbar is:


blogger navbar


Blogger navbar allows users to easily navigate to other random blogs and it also has a feauture to search the blogs ,and mark any blog as spam.
So,now you have a clear idea of what really a blogger navbar is.So, why so many people prefer to just remove the navbar inspite of the feautures it has like search,etc.Many people think that, it spoils the look of the blog,especially if your blog has differnet subtitle layout which looks too obvious to see for a visitor.Well, let me come to the actual point on how to disable or hide your blogger navbar.

Below is the step-by-step procedure on how to do it with photos to make it easy to understand.

1.Sign in to your blogger account and click the layout button next to your blog name

click the layout button


2.Next,click the edit html tab as shown in the below picture.


edit html


3.Add the below html code as specified in the below picture.

#navbar {
height: 0px;
visibility: hidden;
display: none;
}


add the code like this

4. Save the changes.

Now, you can see your blog without that navbar(this tip can only hides the navbar,it doesn't completely delete it).If you want the navbar to appear again,just remove that code and save the changes.
If you have any doubts,regarding this post,don't hesitate to ask.You can ask your doubts via comments to this post.

Sunday, 21 December 2008

How to install Blogger Template?

How to install Blogspot Template?

Everyday so many readers leaving comments asking "How to install xml blogger templates?".
So, to make it easier for you, here is the complete tutorial on how to install blogger templates downloaded from this site..

1.First download the template and unzip the file using winrar or winzip. After extracting the file you will see a folder named Images(incase if you lost) and an xml file.

2.Now, sign in to Blogger dashboard and click on the layout.

click on the layout

3.Here is the important step, after uploading any new Blogger template, all of the previous widgets like your google adsense ads,text,profile,poll,etc etc will be lost.
So, to avoid this to happen, in this step click on 'edit' on all the widgets and copy the codes into notepad,etc.

backup widgets

4.Next, click on the 'Edit html' tab

edit html

5.You'll see an option to download the current template, so do it!

download the template

6.Just below that,there's an option of uploading new template.So, use the Browse button and upload the downloaded xml file(which we discussed in step 1).

Upload the template

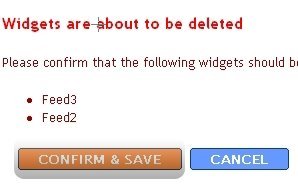
7.Now, a message appear saying that your widgets are about to be deleted.Click on the Confirm & Save (no problem doing this because we already copied the widget codes in Step 3).

confirm and save

Now you successfully installed the template :)
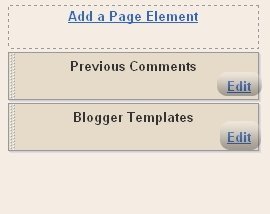
Click on the 'Page elements' page now and add the codes that you copied in step3 using the 'Add a Page Element' option.

Note:The *Images(incase if you lost)* folder contains all the image files used in the template.
Daily thousands of template copies are downloading from this site.. so, in future if my server bandwidth exceeds, you may see images not loading in your sites.So, For this not to happen, Upload all the images to your own server..
Doing this is very simple, Click on the 'Edit html' and go through the template code and replace all the image links(starts with http and ends with .jpg or .gif or .png) with the direct image links you got after uploading the images to any Free image hosting service like photobucket,etc. and SAVE THE CHANGES.

Friday, 12 December 2008

Blogspot Tutorial How to Settings your blog?

Blogger Tutorial How to Settings your blog?


If your blog want caried by google, you must doing several settings. This is how to setting your blog:

Login to blogger.com with your ID.


If your blog more than 1, click at the blog title want to setting.


Click Setting and then click Basic. Several form that must in the contents to the menu basic:


Title : Content with your blog title. Example : Blog Tutorial.


Description : Content with your description blog. Example : All about blogging can find here.


Add your blog to our listing : chose Yes, so that every time posting always entered the Blogger.com list.


Show Quick Editing on your blog : Chose Yes.


Show Email post link : It is best to chose Yes, but if you chose No also it's allright.


Show compose Mode for all your blog : Chose Yes.


Show transliteration button for your post : chose Yes if the you wanted to be button to change normally alphabet to hindi (India) alphabet, Chose No if being the reverse.


Click Save Settings.


Finish.


Click Publishing to arrange the publishing menu.


Blog’Spot Address : Content with your blog address. Example : kolom-tutorial.


Send Pings : Chose Yes.


Click Save Settings.


Finish.


Click Formatting to arrange the formatting menu.


Show : Chose the number of post want you to display in your blog. Example : Show : 6 post, it's means your posting will display in your page Totally six posting. Chose Post (don't days) at pulldown menu


Date header Format : Chose the style of date/month what you wanted, this date/month will display above your post.


Archive Index Date Format : Chose the style for your archive


Timestamp Format : Chose the style of the time, what you wanted.


Time Zone : Chose the matching zone with your place. Example for WIB : [UTC+7.00] jakarta.


Language : Chose language what you wanted.


Convert line break : Chose Yes, but if you chose No it's allright.


Show Link Field : Chose No, but if you chose Yes it's allright.


Enable Float aligment : Chose Yes, but if you chose No it's allright.


Click Save Settings.

Finish.


Click Comment to arrange the Comment menu.


Comments : Chose Show.


Who Comment? Chose Anyone. It's means anyone can comment to your post.


Comments Default for Post : Chose New post Have Comments


Back links : Chose Show. It's means you will know if another people has linked to your post.


Backlinks default for Posts : Chose New post have Backlinks.


Show comments in a popup window? : Chose Yes. It's means when the people click Comment link your blog not lost.


Show word verification for comments? : It's better to chose Yes


Enable comment moderation? : Chose No, but if you wanted chose Yes it's allright.


Show profile images on comments? : Chose Yes. It's means the photo of commentator of blogger member can display.


Comment Notification Address : Content with your email address.


Click SAVE SETTINGS.


Finish.


Click ARCHIVING to arrange the archiving menu.


Archive Frequency : Chose monthly.


enable Post Pages? : Chose Yes.


Click SAVE SETTINGS.


Finish.


Click Site Feed.


Publish Site Feed : Chose Yes.


Descriptions : Chose Full


Article Footer : If you have advertising code like Google Adsense, you can insert the code here.


Click SAVE SETTINGS.


Finish.


One work of being finished, was kept welcoming the other work...

Blogger Tutorial Making a Blog at Blogspot

Blogspot Tutorial Making a Blog at Blogspot


Blog (abbreviation from Web log) is sites which more dominant in private characteristic. This means, most of the content will be affected (realize or not) by the characteristic of the Blogger (Blog user) himself.


Blog was made by the designers of the blog provider in order to work automatically and easily


to be operated on, so for we that still was confused with the programming language to make one website still not the problem.If you could have made an email account in the internet, then in made blog then I was convinced you could.


2. How to make a blog?


As if when we start to make an ordinary e-mail, we’ll need an account first, to make a blog. Because of that reason, feel please to register yourself in free blog provider. We can find a lot of free blog provider in internet, and some blog provider which really famous nowadays, are http://www.blogger.com/, http://www.wordpress.com/ or http://www.blogsome.com.

In this chance, I’m going to review about make a blog in http://www.blogger.com/ Click the picture below to register.


Saw the picture below:


please click here


After we arrive in Blogger.com, you will see picture like shown above. Now, follow my instruction.


  • Click an arrow sign, inscribed with “CREATE YOUR BLOG NOW


  • Complete the ‘e-mail address’ form, with your own e-mail address (of course with the valid one).


  • Rewrite your e-mail address in form ‘retype e-mail address’


  • Type the password as you wanted to. Type it in form, ‘enter a password’


  • Retype your password in form ‘type password again’


  • Type the password as you wanted to. Type it in form, ‘enter a password’


  • Retype your password in form ‘type password again’


  • Type the word which has shown, in form ‘word verification’. Click the white little square beside the sentence, ‘I accept the Terms of Service’.


  • Click an arrow sign inscribed with “CONTINUE


  • Write the title of your blog that you desire (you can change it later) in form ‘Blog Title’


  • Type the name of your site in form ‘Blog Address (URL)’ .


  • Type verification word which shown in form ‘word verification’. After that, click an arrow image inscribed with word, ‘CONTINUE’.


  • Choose one template that you wanted to (You can change it later, if you want), then click again an arrow sign inscribed with word ‘CONTINUE’.


  • Wait a moment. After you meet a sentence ‘Your blog has been created’. Click an arrow sign (again) which inscribed with “BEGIN POSTING’. Feel please to fill up your blog with everything you want to. After you finish with your first posting, just click the sentence, ‘PUBLISH YOUR POSTING’, Please write What you want, if being finished then click of the publish button.


  • It's Done.


  • Friday, 28 November 2008

    Blogspot Tutorial / Submitting your Sitemap to Yahoo

    Submit blogger sitemap to yahoo to index your web pages

    This post explains how to submit your blogger sitemap to Yahoo.By submitting your sitemap to yahoo, they will index your web pages in yahoo search engine and provide you with detailed information related to your blog like which pages are linking to yours,popular pages in your site and you can submit and track feeds for your sites.

    Also,you have the choice to delete any urls of your blog if you won't want to index certain pages of your site.
    Submitting your site to yahoo is easy and give your web pages more exposure.
    All you need is a YAHOO ACCOUNT(ID).However,you don't need an yahoo ID to know the information like how many pages are indexed,etc.But,if your blog is a new one or no pages in your blog are indexed(type your blog url in yahoo search and see to check whether your web pages are indexed or not), then you want Yahoo id to submit your sites,feeds,etc.
    Let't see how to make yahoo index your webpages by submitting your blog sitemap.
    1.Go to Yahoo Site Explorer


    2.Click on the 'Sign in' link which is at the top of the page,see the screenshot below(If you don't have a Yahoo id, you can get one here) and sign into your accoutnt.


    click on the 'sign in link'

    3.Type your blog url in the box provided as shown in the below screenshot.Don't forget to replace the 'yourblogurl' with the original url of your blog and click on the 'Add My Site'

    4.After adding your site,you need to Authenticate(Verify your ownership).
    There are two ways to verify your ownership.One is to upload a file to the root directory of your site which can't be possible in blogger.

    Another one is to 'adding a metatag' which is possible and the only way to verify ownership for bloggers.First,copy the metatag..
    Next,sign in to your blogger account>Edit html and paste the metatag below the head tag and SAVE THE CHANGES,look at the screenshot below.

    Next,you will get a message saying that 'Your site is pending authentication'

    Note:Don't remove the metatag,they will revalidate your ownership by checking your ownership regularly.

    5.Next,go back to the 'Site explorer home', and check the box next to your blog url and click on the Manage button.


    6.Type rss.xml or atom.xml in the box provided.It helps yahoo to discover more of your site content via your rss or atom feeds and to index your blog pages quickly whenever your blog is updated.Next,click on the add feed button.


    That's it.Now,you have sucessfully submitted your blog sitemap to yahoo.Check your account after a couple of days and you will see your blog indexed in yahoo search engine.
    Blogger Tutorial / Submitting your Sitemap to Google

    how to submit blogger sitemap to google-useful tip for new bloggers

    This tip explains how to generate and submit blogger sitemap to google webmaster toolsBefore doing this,let me say what are sitemaps and how they will help us.The reason we use them is,they will help google bot to crawl,index pages of your site and tell you if there are any problems when they try to index it.It also helps you to know,how many pages exactly are indexed,and what people searched in the search engine to visit your site.
    Let me explain the detailed procedure on how to submit your blogger sitemap to google.
    1.First,go to google webmaster tools and sign in with your gmail account.
    2.After you logged in, you will see this asking you to add a site.
    google webmaster tools

    Add your blog url(ex:kranthitips.blogspot.com).Don't add with http or www.

    3.Next,it asks you to verify your site.It is just to confirm whether you are the owner or not.

    CLICK on the 'verify your site' link.

    click the 'verify your site' link


    Next,

    choose verification method


    4.There are two ways to verify your ownership but, there is only one way for the blogger users to add a metatag.

    copy the metatag

    5.Copy the metatag.

    Now,sign into your blogger account>click the layout button>Edit html and paste the metatag just after the head tag and save the changes.

    paste the metatag like this
    and click the verify button in the google webmaster tools and there will be a confirmation message saying that you have sucessfully verified.


    conformation message

    Now,you have to submit a sitemap for google to crawl your site.Go back to the google webmaster dashboard or (home) and click the 'Add' link which is next to your blog name and in the Sitemaps column.Then,you see this,


    Choose 'Add general web sitemap' from the dropdown menu and type rss.xml or atom.xml next to your blog address as shown below


    or

    and click the 'Add General Web Sitemap' button.

    6.That's it.Now your sitemap is successfully submitted to google.Check 2 or 3 days after and you will see the detailed statistics of your blog(indexed pages,any errors,etc.)

    If you have any questions regarding this,you can ask here via your comments